
 Support
Polair3D Test Case
The goal of the following test case is to have an insight of Polyphemus functionalities. A typical application of chemistry transport model is continental simulations of photochemistry. We propose here to run a simulation over Europe for one day (2004-08-09).
Note that a more complete and detailed version of this documentation is available in Polyphemus User's Guide although this should be sufficient to get the simulation running.
Step 1: Obtaining and Installing the Test Case
You must have already downloaded and installed Polyphemus to have this test-case working.
This test-case is up-to-date with the version 1.10 of Polyphemus. Below, [version] will stand for the version number you are using.
- First, you need to download an archived file which contains
configuration files and some data:
TestCase-Polair3D-1.10.tar.bz2.
To uncompress this file, execute the following command:
$ tar xjvf TestCase-Polair3D-1.10.tar.bz2
This create a directory TestCase-Polair3D/ (referred to below as TestCase/), containing:- a directory raw_data/, with data necessary for preprocessing.
- a directory data/, with all data precomputed. It is also used to store the results of preprocessing.
- a directory config/, with all configuration files used.
- a directory results/ where the results are stored.
- a file version stating for what version of Polyphemus the test-case was made.
- You also need to download the
meteorological raw data. To uncompress this file and put it in
TestCase/raw_data/MM5/, execute the following command:
  $ cd TestCase/raw_data/MM5/
  $ wget http://cerea.enpc.fr/polyphemus/test_case/MM5-2004-08-09.tar.bz2
  $ tar -xjvf MM5-2004-08-09.tar.bz2
- Finally, you will need the USGS land use classification you can download at
USGS land use classification for Europe and
USGS land use classification for Africa and uncompress in the directory raw_data/ground
  $ cd raw_data/ground
  $ gunzip afusgs2_0l.img.gz
  $ gunzip eausgs2_0le.img.gz
Step 2: Verifying the General Configuration File
The file config/general.cfg is used by all preprocessing programs and as such must be the first file you modify when performing preprocessing.
Here is an example of config/general.cfg:
[general]

Directory_raw_data: raw_data
Directory_computed_fields: data
Directory_ground_data: <Directory_computed_fields>/ground


[domain]

Date: 2004-08-09
Delta_t = 1.0
x_min = -10.0	Delta_x = 0.5	Nx = 65
y_min = 40.5	Delta_y = 0.5	Ny = 33
Nz = 5
Vertical_levels: config/levels.dat
Normally this file should not need to be modified. The domain is defined for a simulation over Europe and the date must be 2004-08-09.
Step 3: Computing Input Data
3-a) Land Use Cover
Compile and execute luc-usgs:
  $ cd ~/Polyphemus-[version]/preprocessing/ground
  $ ../../utils/scons.py luc-usgs
  $ cd ~/TestCase/
  $ ~/Polyphemus-[version]/preprocessing/ground/luc-usgs config/general.cfg \
                                                           config/luc-usgs.cfg
You can use make instead of scons to compile the programs.
The output on screen will be:
Reading configuration files... done.
Memory allocation for data fields... done.

Reading LUC data... done.
Building LUC data on output grid... done.

Writing output data... done.
3-b) Roughness
The preprocessing program roughness needs as input data the results of luc-usgs.
  $ cd ~/Polyphemus-[version]/preprocessing/ground
  $ ../../utils/scons.py roughness
  $ cd ~/TestCase/
  $ ~/Polyphemus-[version]/preprocessing/ground/roughness config/general.cfg \
                                                          config/roughness.cfg
The output on screen will be:
Reading configuration files... done.
Reading roughness data... done.
Writing roughness binary ... done.
3-c) Meteorological Data
Compile and execute MM5-meteo to process the MM5 file you have downloaded.
  $ cd ~/Polyphemus-[version]/preprocessing/meteo/
  $ ../../utils/scons.py MM5-meteo
  $ cd ~/TestCase/
  $  ~/Polyphemus-[version]/preprocessing/meteo/MM5-meteo config/general.cfg \
                                                  config/MM5-meteo.cfg 2004-08-09
The output on screen will be:
Reading configuration files...  + Reading domain information...
  + Reading input files paths and names...
  + Reading physical parameterizations...
 done.
Memory allocation for grids...
  + Output grids...
 done.
Memory allocation for output data fields... done.
Conversion from sigma levels to heights...
  + Computing sigma-levels and terrain elevation data...
  + Computing vertical levels in meter at cross points...
 done.
Converting from latlon to MM5 indices... done.
Applying transformation to read fields... done.
Computing pressure... done.
Computing surface pressure... done.
Interpolations...
  + Computing relative humidity and critical relative humidity... done.
  + Computing cloud profile... done.
 done.
Computing Richardson numbers...
  + compute potential temp
  + LinearInt
 done.
  + Computing attenuation... done.
Linear interpolations...
  + Liquid Water content
  + SpecificHumidity
  + CloudBaseHeight
  + SkinTemperature
  + SensibleHeat
  + Evaporation
  + SurfaceTemperature
  + SoilWater
  + SolarRadiation
  + Rain
  + FrictionModule
  + BoundaryHeight
  + WindModule10
  + Cloud Fraction
  + Attenuation
 done.
Computing Kz (Louis formula)... done.
Computing PAR... done.
Writing data...  (directory_out=data/meteo/)
To compute vertical diffusion using Troen and Mahrt parameterization, compile and execute Kz_TM.
  $ cd ~/Polyphemus-[version]/preprocessing/meteo/
  $ ../../utils/scons.py Kz_TM
  $ cd ~/TestCase/
  $ ~/Polyphemus-[version]/preprocessing/meteo/Kz_TM config/general.cfg \
                                                 config/MM5-meteo.cfg 2004-08-09
The output on screen will be:
 Reading configuration files... done.
Memory allocation for data fields... done.

Extracting fields... done.

Computing Kz... done.
Writing output files... done.
Step 4: Launching the Simulation
4-a) Modifying the Configuration File
You should check and modify config/racm.cfg if necessary. You have to check the paths (in particular check that the data and saver file are config/racm-data.cfg and config/racm-saver.cfg) and to make sure that the date for the simulation is 2004-08-09 (date for which the meteorological data have been computed).
4-b) Modifying the Data File
Check config/racm-data.cfg. As before, check the paths and dates. In particular, if the dates in any section (except [photolysis], see below) are not right, you can have an error message.
ERROR!
An input/output operation failed in FormatBinary<T>::
Read(ifstream& FileStream, Array<TA, N>& A).
   Unable to read 42900 byte(s). The input stream is empty.
Indeed, input data can be computed for several days, so the program will
discard the data for the days between Date_min in a section of
racm-data and Date_min for the simulation. Here, as
the data has been computed for one day only, it would be as if the data files
were empty, hence this error.
NOTE in the case of photolysis, data are provided for a whole year
(Date_min must be 2004-01-01_12).
4-c) Simulation
Compile the driver:
  $ cd ~/Polyphemus-[version]/processing/photochemistry
  $ ../../utils/scons.py polair3d
  $ cd ~/TestCase/
  $ ~/Polyphemus-[version]/processing/photochemistry/polair3d config/racm.cfg
The output on screen will be:
Current date: 2004-08-09 00:00
Current date: 2004-08-09 00:10
Current date: 2004-08-09 00:20
Current date: 2004-08-09 00:30
	[...]
Current date: 2004-08-09 22:10
Current date: 2004-08-09 22:20
Current date: 2004-08-09 22:30
Current date: 2004-08-09 22:40
The computation should take less than five minutes.
In order to check your results, type:
$ ~/Polyphemus-[version]/utils/get_info_float results/NO.bin
You should get something like:
Minimum: 3.47425e-09
Maximum: 100.513
Mean: 0.58594
Step 5: Visualizing results
To visualize results you have to put the path to Polyphemus-[version]/include in your PYTHONPATH. For instance, for Bash users add export PYTHONPATH=$PYTHONPATH:~/Polyphemus-[version]/include to your .bashrc.
Then go the directory results/ and launch IPython.
$ cd results/
$ ipython
In [1]: from atmopy.display import *
In [2]: m = getm('disp.cfg')
In [3]: d = getd('disp.cfg')
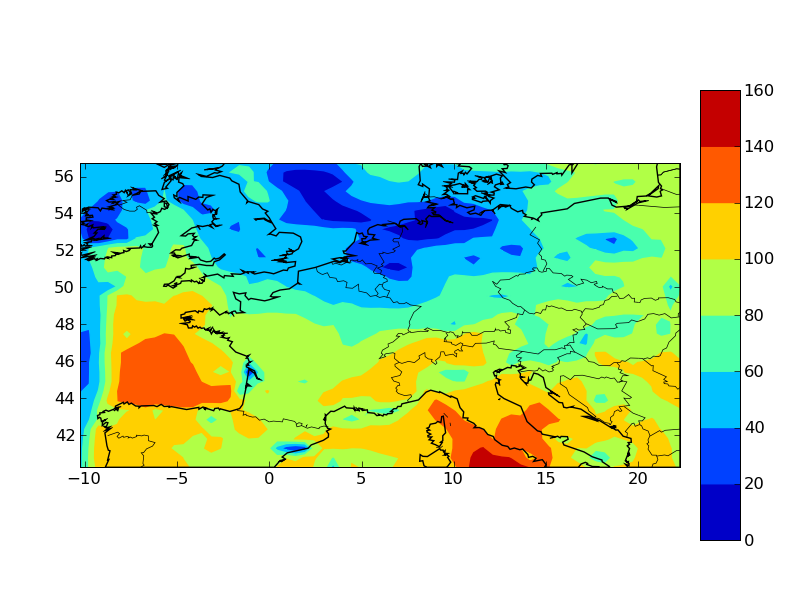
In [4]: dispcf(m, d[5, 0]) The output figure will be:
Previous Versions of the Test Case
TestCase-Polair3D-1.6.tar.bz2 for versions 1.6 to 1.8.1 of Polyphemus.
TestCase-Polair3D-1.5.tar.bz2 for versions 1.5 to 1.7.4 of Polyphemus.
TestCase-Polair3D-1.3.tar.bz2 for versions 1.3 to 1.4 of Polyphemus.
For older test cases, you need to download the MM5 file.
TestCase-1.1-Eulerian.tar.bz2 for versions 1.1 to 1.2.2 of Polyphemus.
TestCase-1.0-Eulerian.tar.bz2 for Polyphemus-1.0.
TestCase-0.1.tar.bz2: for version 0.2 of Polyphemus.
